Pearlescent pigments, composed of platelet-shaped particles like mica coated with Titanium Dioxide or Iron Oxide, create the shimmer seen in cosmetics such as eyeshadows, nail polishes, and foundations. Proper dispersion is essential to align these particles for maximum light reflection, ensuring consistent shimmer, vibrant color, and extended shelf life. Poor dispersion, however, leads to clumping, uneven color, and reduced gloss.
Key steps for effective dispersion include selecting low-to-medium shear mixers to prevent particle damage, pre-wetting pigments to reduce clumping, and maintaining proper viscosity during mixing. Avoid high-shear tools, which can fracture particles and diminish their reflective properties. Quality control tests – like settling tests, gloss measurements, and filter pressure tests – help ensure uniformity and stability.
High-quality pigments, sourced from reliable suppliers, are critical to achieving optimal results. Using synthetic mica or glass flakes ensures purity and consistent performance. These methods not only improve product aesthetics but also reduce formulation challenges for long-wear cosmetics, saving time and costs in production.
A Technical Overview – How to make a pigment dispersion?
sbb-itb-aa4586a
Selecting Equipment for Dispersion
When working with pearlescent pigments, proper mixing is essential to maintain their integrity. These delicate, platelet-shaped particles are responsible for the shimmer effect, and they require careful handling to preserve their light-reflecting properties. The right equipment ensures even dispersion without applying excessive mechanical force that could damage the flake structure.
Low to Medium Shear Mixers
Low shear mixers, operating at speeds between 25 and 300 RPM, are ideal for distributing pearlescent pigments without fracturing their delicate flakes. Equipment such as Cowles, Myers, or Silverson mixers, when set to low speeds, provides the necessary agitation to evenly disperse the pigments while maintaining their reflective qualities.
Before introducing pigments, higher speeds (300 to 1,500 RPM) can be used to mix base ingredients like fluid carriers, viscosity enhancers, and gloss agents. Once these components are fully blended, it’s crucial to reduce the speed significantly before adding the pearlescent pigments. As noted in patents, "Under low agitation, so as not to fracture the pigment particles, at least one pearlescent pigment is added" [3].
Avoiding High-Shear Dispersers or Grinders
High-shear dispersers and grinders should be avoided when working with coated mica pigments. These tools, while effective for standard pigments like carbon black or titanium dioxide, can generate mechanical forces strong enough to fracture mica platelets. This results in a dull, matte finish, as the structure responsible for the pearlescent luster is irreparably damaged.
Once the pigment flakes are broken, they lose their ability to refract and reflect light effectively. This damage is permanent and compromises the shimmer effect, making the selection of appropriate equipment a critical step in the formulation process.
Recommended Screen Pack Mesh Sizes
Using screen packs with mesh sizes between 40 and 60 is key to achieving optimal dispersion. These mesh sizes allow uniform particles to pass through while capturing larger agglomerates that might affect the product’s quality. The screens help maintain consistency without subjecting the pigments to damaging shear forces, preserving their light-reflecting properties.
Particle size has a direct impact on the final appearance. Smaller particles, typically 5 to 25 µm, create a satin sheen, while larger particles, up to 500 µm, produce a sparkle or glitter effect [2]. The vehicle must suspend the pigments effectively while allowing smooth flow through the screen pack. Selecting the correct mesh size ensures the desired visual effect is achieved and the pigment’s integrity is maintained throughout the dispersion process.
By following these guidelines, you can integrate these methods into your formulation with precision.
This content is for informational purposes only. Consult official regulations and qualified professionals before making sourcing or formulation decisions.
Step-by-Step Dispersion Process
3-Step Process for Dispersing Pearlescent Pigments in Cosmetics
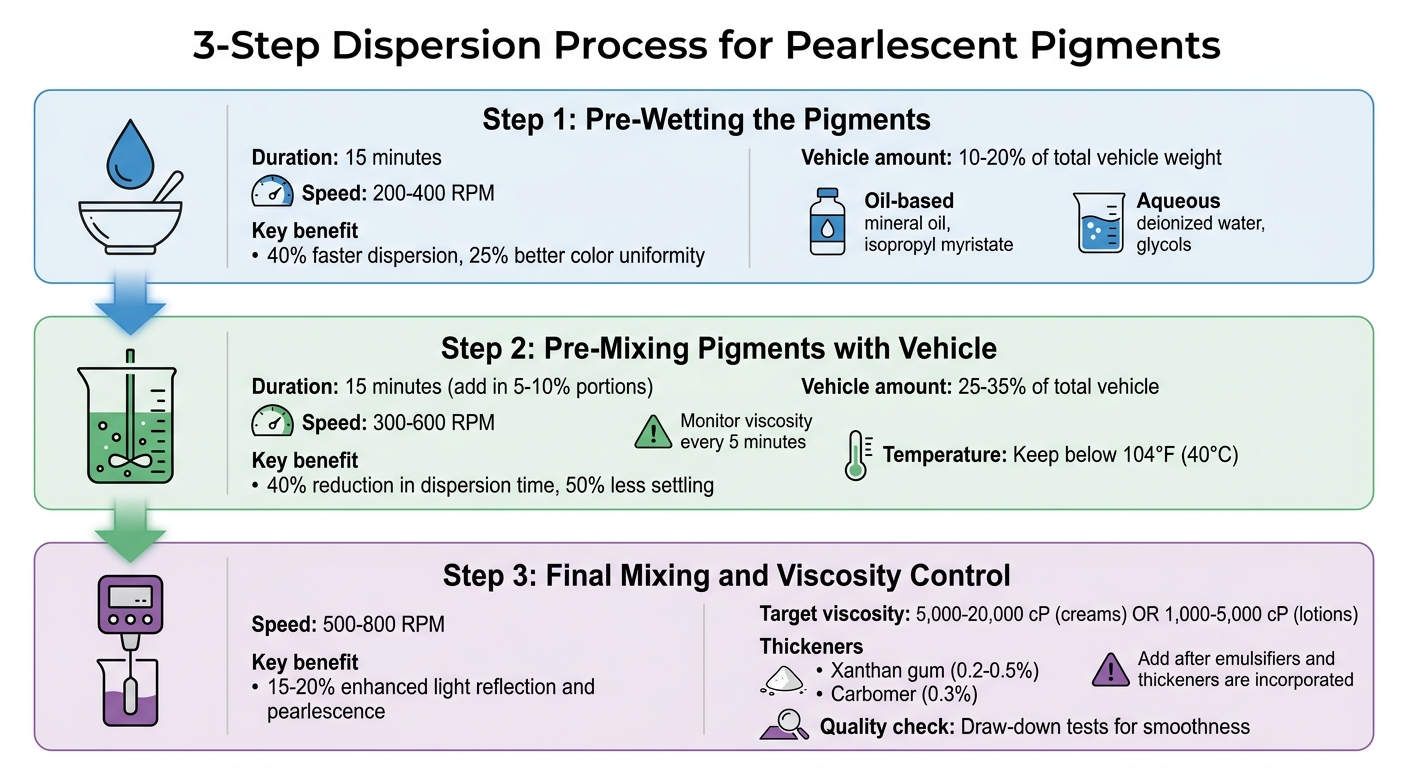
Achieving uniform pigment dispersion and optimal light reflection involves a three-step process: pre-wetting, pre-mixing, and final mixing. Each phase plays a key role in preventing issues like clumping or settling, ensuring the pigments maintain their reflective properties throughout the formulation.
Pre-Wetting the Pigments
Pre-wetting is the first step, where pigments are moistened with a small portion of the vehicle – such as deionized water, mineral oil, or glycols – for about 15 minutes. This step reduces surface tension and minimizes clumping. Use 10–20% of the total vehicle weight relative to the pigment weight to create a paste.
For oil-based formulations, non-polar oils like mineral oil or isopropyl myristate are ideal. In aqueous systems, deionized water or glycols work better. Stir the mixture at 200–400 RPM, ensuring the sides of the container are scraped for thorough wetting. Pre-wetted pigments disperse faster – by about 40% – and improve color uniformity by 25% in emulsions compared to adding pigments dry [1][4].
Once the pigments are evenly moistened, they can be gradually incorporated into the vehicle.
Pre-Mixing Pigments with Vehicle
Building on pre-wetting, the pre-mix phase further integrates the pigment paste into the formulation. Combine the pre-wetted pigments with 25–35% of the total vehicle, stirring at low speeds of 300–600 RPM. This creates a uniform pre-mix that blends easily into the full batch while protecting delicate pigment layers from shear damage. Add pigments incrementally, in 5–10% portions, over 15 minutes. Keep temperatures below 104°F (40°C) to avoid solvent evaporation and prevent lumps.
For example, in lipstick formulations, pre-mixing 10% mica pearlescent pigments with a 30% castor oil vehicle improves gloss uniformity by 25% compared to direct addition. Similarly, in body washes, a 25% glycol vehicle pre-mix enhances color stability over six months, reducing settling by 50% in tests [1][6]. High-load formulations containing 5–15% pigment can see up to a 40% reduction in dispersion time with this method [4][8].
Once the pre-mix is homogeneous, it’s ready for the final mixing stage, where viscosity and pigment alignment are fine-tuned.
Final Mixing and Viscosity Control
The final step involves blending the pre-mix into the complete formulation while managing viscosity and ensuring proper pigment orientation. Add the pre-mix after emulsifiers and thickeners have been incorporated to avoid damage from earlier high-shear mixing. Aim for a viscosity range of 5,000–20,000 cP for creams or 1,000–5,000 cP for lotions. Stir at 500–800 RPM, gradually adding the pre-mix and any remaining vehicle or thickeners like xanthan gum (0.2–0.5%) to achieve the desired consistency.
Viscosity should be monitored every five minutes and adjusted with diluents or thickeners as needed. Perform draw-down tests to confirm smoothness and sheen. Proper viscosity ensures pigments align correctly, enhancing light reflection and pearlescence by 15–20% [8][4]. For instance, a gel eyeliner batch with viscosity below 3,000 cP experienced settling, which was corrected by adding 0.3% carbomer. Conversely, foundations with viscosity above 25,000 cP faced clumping, resolved by shear-thinning with triethanolamine [7][5].
This content is for informational purposes only. Always consult official regulations and qualified professionals before making sourcing or formulation decisions.
Formulation Compatibility and Timing
To achieve consistent color and shimmer, it’s essential to align pigment properties with the viscosity of your formulation. Proper timing when adding pearlescent pigments is equally important, as it protects their delicate flake structure and ensures smooth blending into the base.
Matching Pigment Particle Size to Viscosity
Pearlescent pigments, typically ranging from 10 to 150 microns in size, should be matched to the viscosity of the formulation for optimal performance [9]. In low-viscosity products like serums and lotions, smaller pigment particles work best to maintain an even suspension. On the other hand, thicker formulations, such as creams and gels, benefit from larger particles, which reduce the risk of sedimentation. For most applications, pearlescent pigments are used at 3–8% of the total formulation weight [9]. If higher concentrations are needed, thinning agents or surface-modified pigments can help manage viscosity. To ensure batch stability, high-quality pigments should maintain a color difference (ΔE) of ≤1.5 [9].
Adding Pigments at the Right Stage
The timing of pigment addition plays a critical role in preserving their reflective qualities. Always add pigments after emulsifiers, thickeners, and base ingredients have been fully incorporated. Introducing pigments too early can expose them to high shear forces, damaging their coatings and reducing their luster. To avoid compromising the pearlescent effect, do not mix these pigments with high-opacity materials like Titanium Dioxide during the same phase. If both are required, disperse Titanium Dioxide first, allowing it to mix thoroughly before adding the pearlescent pigments. Additionally, control mixing time and speed to prevent excessive shear, which can harm the pigment’s flake structure and diminish its shimmer.
Using Pre-Blends for Stability
Pre-blending pigments can further enhance stability and uniformity. Techniques like encapsulation or solvent pre-dispersion at 1–3% help stabilize pigments and prevent settling. For powder coatings, encapsulation or bonding methods are effective in maintaining pigment separation. Pre-dispersing pigments in a compatible solvent, such as ethanol or a water-based emulsion, at 1–3% can also improve consistency and reduce processing time. Synthetic mica and glass substrate pigments are versatile, working well with water-based, solvent-based, and UV-curing resin systems, including Polyurethane (PU) and Acrylics. Glass substrate pigments can endure processing temperatures up to 200°C (392°F), while synthetic mica remains stable up to 150°C (302°F). Additionally, surface-modified pre-blends can help control viscosity increases when incorporating pigments into oil-in-water emulsions or anhydrous formulations.
These strategies, when combined with effective dispersion techniques, ensure optimal pigment performance and stability.
This content is for informational purposes only. Always consult official regulations and qualified professionals before making sourcing or formulation decisions.
Quality Control and Testing Methods
Testing ensures that dispersions are both uniform and stable, building on the colorant dispersion best practices. By conducting settling tests, gloss measurements, and filter pressure tests, you can evaluate particle suspension, optical consistency, and overall dispersion performance.
Settling Tests
Settling tests are used to determine how well pigments stay suspended over time, which is especially important for heavier pigments like borosilicate glass, with a density of about 2.6 g/cm³ [11]. To perform this test, prepare a sample using a high-shear mix at approximately 1,000 RPM for 5 minutes [9]. Let the sample stand and then observe changes in light transmittance, gloss, and sediment formation. A high-quality dispersion will maintain a color difference (ΔE) of 1.5 or less [9]. If settling occurs too quickly, adding rheology modifiers such as silica or natural hydrocolloids can improve stability [11].
Gloss Measurement
After assessing settling, gloss measurements evaluate the surface’s ability to reflect light evenly, which is key for achieving uniform luster and iridescence. Factors like flake orientation, particle size, pigment concentration, and film transparency influence the final sheen [2]. A fiber optic probe can measure reflected light in a stirred sample, while an on-line computer calculates the ratio of the standard deviation to the mean intensity to quantify the pearlescent effect [10]. Combining this data with turbidity measurements provides a detailed optical profile. Smaller particles (around 10 µm) create a smooth, satin-like sheen, while larger particles (over 60 µm) produce a sparkling effect [11]. Additional texture or skin-feel tests can confirm that the dispersion is free of grit or streaks [11].
Filter Pressure Tests
Filter pressure tests help identify any remaining agglomerates that may not have been fully dispersed during mixing. The formulation is passed through a standardized filter while monitoring pressure; any spikes indicate clumping that could compromise product quality. If clumps are detected, it’s essential to revisit pre-wetting and de-agglomeration steps [11]. Together, these tests ensure the final product maintains consistent pearlescence and long-term stability.
This content is for informational purposes only. Always consult official regulations and qualified professionals before making sourcing or formulation decisions.
Common Dispersion Mistakes and Solutions
Even skilled formulators can run into issues with dispersion, where minor errors might cause settling, clumping, or a reduction in shine. Recognizing these common problems helps avoid costly batch failures. The insights below build on earlier testing methods to ensure pigments perform as intended.
Here’s a quick reference table outlining typical problems and practical fixes, complementing earlier dispersion and testing guidelines.
Common Problems and Fixes:
| Common Problem | Likely Cause | Recommended Solution |
|---|---|---|
| Pigment Settling | High particle density (e.g., borosilicate) or low vehicle viscosity. | Add rheology modifiers like silica or polymeric thickeners to stabilize the suspension. |
| Clumping/Agglomeration | Insufficient wetting of the pigment surface. | Pre-mix pigments with part of the vehicle to ensure full wetting before dispersion. |
| Loss of Pearlescent Shine | Particle breakage or interference from opacifiers. | Use gentle sweep mixing blades instead of high-shear tools; limit additives like talc or TiO₂. |
| Gritty Texture | Poor dispersion or overly large particle sizes. | Improve wetting and dispersion; test texture and blend with smaller particle sizes if needed. |
| Streaking in Cold-Process | Uneven distribution during initial mixing. | Focus on thorough pre-wetting and gradually incorporate pigments into the base. |
To protect the stability and optical qualities of pearlescent pigments, add them during the cool-down phase of heated emulsions. This step ensures their visual effect remains intact while maintaining formulation stability.
Industry professionals stress that using careful sweep mixing when working with effect pigments preserves particle integrity and aligns with the best practices outlined above.
Note: This information is intended for guidance only. Always consult official regulations and experienced professionals for sourcing or formulation decisions.
Sourcing High-Quality Pearlescent Pigments
When it comes to achieving optimal dispersion and performance, the quality of your pearlescent pigments is non-negotiable. It’s essential to work with suppliers who prioritize pigment purity, adhere to regulatory standards, and maintain batch consistency. Using materials like synthetic mica or glass flakes can significantly enhance purity, ensure uniform particle size, and deliver consistent color outcomes. These high-quality pigments form the cornerstone of effective dispersion, as discussed earlier. Setting strict criteria for selecting suppliers ensures your process starts with the best materials available.
Why Supplier Standards Matter
The foundation of quality lies in sourcing. Suppliers with rigorous certifications, such as ISO, help ensure that your pigments meet high standards. These suppliers minimize batch variability and provide comprehensive documentation, including Certificates of Analysis (CoA), verifying compliance with heavy metal limits and regulatory standards like USFDA (CFR Title 21). Additionally, technical specifications should confirm particle size uniformity through laser diffraction testing and coating integrity via X-ray diffraction analysis.
"Synthetic mica is widely used and generally suitable for cosmetics when it’s cosmetic-grade and supported by supplier documentation (e.g., specs/CoA, heavy metal limits)." – Vivify Beauty Care [11]
The Role of Timely Delivery
Sourcing isn’t just about quality – timing matters too. Just-in-time (JIT) delivery ensures that pigments arrive exactly when needed, supporting tight production schedules and reducing risks associated with overstocking or material degradation. This approach keeps your pigments fresh and properly stored, maintaining their performance. Companies like Allan Chemical Corporation specialize in dependable JIT delivery for both small and large-scale production needs, leveraging trusted relationships with vetted manufacturers to guarantee consistent access to high-quality pearlescent pigments.
This content is for informational purposes only. Consult official regulations and qualified professionals before making sourcing or formulation decisions.
Conclusion
Achieving effective dispersion of pearlescent pigments demands precision at every step, from selecting the appropriate equipment to maintaining strict quality control. Using low to medium shear mixers helps preserve delicate coatings, while proper pre-wetting and aligning particle size with formulation viscosity prevent common issues like settling and texture inconsistencies. These techniques align well with standard formulation processes to deliver reliable product performance.
Thorough quality control measures – such as settling tests, gloss evaluations, and filter pressure tests – are essential for maintaining batch-to-batch consistency. These tests also allow for timely adjustments before scaling up production. For heavier pigments, incorporating polymeric thickeners ensures stable suspensions, even in more challenging formulations.
The foundation of any successful formulation lies in starting with high-quality pigments. Partnering with certified suppliers ensures consistent quality and adherence to FDA-approved cosmetic colorant standards. For instance, Allan Chemical Corporation offers dependable just-in-time delivery and expert technical support, helping you stay on schedule.
By employing these dispersion methods and sourcing premium pigments, you can achieve improved product performance, meet regulatory requirements, and enhance customer satisfaction. Following these steps ensures that your formulations consistently deliver a uniform shimmer and lasting quality.
This content is for informational purposes only. Consult official regulations and qualified professionals before making sourcing or formulation decisions.
FAQs
How do I choose the right pearlescent pigment particle size for my formula?
To choose the appropriate particle size, think about the visual effect and application properties you want to achieve. Smaller particles (2-25 µm) provide a silky, soft luster with excellent coverage. Medium-sized particles (10-60 µm) deliver a pearl-like sheen, while larger particles (10-125 µm) create a more pronounced shimmer. Align the particle size with your formulation’s texture and desired aesthetic to get the best outcome.
What’s the best way to fix pearlescent pigment settling after filling?
To tackle the issue of pearlescent pigment settling, incorporating dispersing and wetting agents during the formulation process is essential. These agents coat the pigment particles, reducing the risk of clumping and settling. Here’s how you can manage this effectively:
- Begin by adding a wetting agent early in the process to enhance the pigment’s ability to mix with the formulation.
- Apply high-shear mixing or use ball milling to break apart any pigment clusters.
- Add dispersants or stabilizers to maintain a uniform dispersion and prevent the pigments from settling again.
Following these steps helps achieve consistent dispersion and long-term stability in your formulation.
How can I tell if I’ve damaged pearlescent flakes during mixing?
Damaged pearlescent flakes show clear signs like clumping, uneven dispersion, or a loss of their signature luster and visual appeal. These problems usually stem from improper mixing techniques or physical damage to the flakes during handling or processing.


Comments are closed