Spill containment systems, such as trays and berms, are essential for preventing hazardous leaks from contaminating soil or water. Corrosion is a major threat to their functionality, leading to cracks, leaks, or structural failure. Regular inspections help maintain compliance with EPA standards and ensure these systems remain effective.
Key steps for inspection:
- Preparation: Use proper PPE (chemical-resistant gloves, goggles, steel-toed boots) and isolate the containment system by removing containers and clearing debris.
- Inspection Tools: Use flashlights, measuring tape, ultrasonic gauges, and pH test kits to detect cracks, thinning, or chemical damage.
- Visual Checks: Look for rust, pitting, discoloration, and cracks, especially in seams, joints, and corners.
- Non-Destructive Testing (NDT): Employ ultrasonic thickness gauges, magnetic particle testing, or dye penetrant testing for hidden flaws.
- Material-Specific Focus: Tailor inspections for concrete (cracks, spalling), metal (rust, thinning), and polymers (crazing, brittleness).
Routine and thorough inspections ensure containment systems meet capacity requirements, prevent failures, and avoid costly penalties. Accurate documentation of findings supports compliance and maintenance planning.
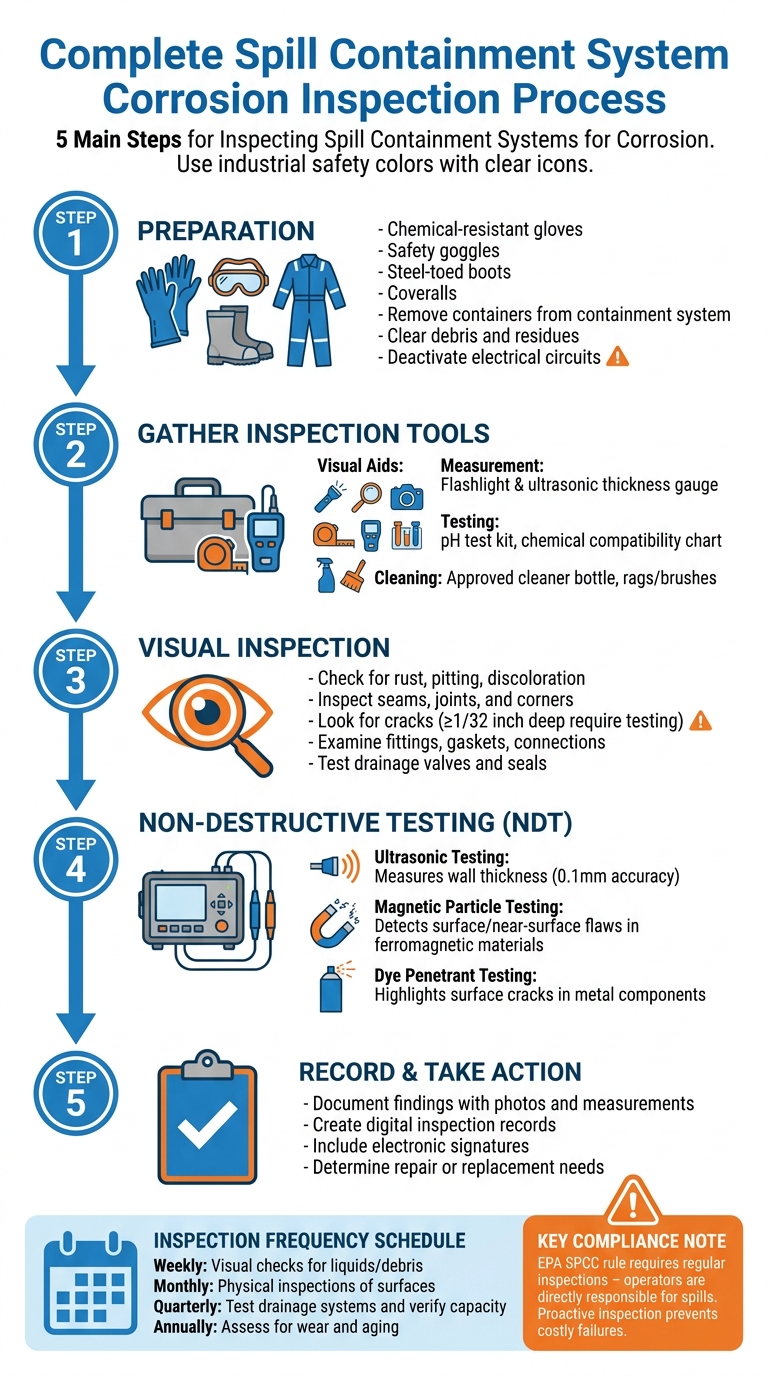
5-Step Spill Containment System Corrosion Inspection Process
Evaluating the Importance of Proper Corrosion Inspections
sbb-itb-aa4586a
Preparing for the Inspection
Getting ready for an inspection means having the right PPE, isolating the system, and gathering essential tools. These steps are critical for preventing hazards and ensuring a thorough and accurate assessment. This preparation lays the groundwork for the visual and non-destructive testing methods discussed later.
Required Personal Protective Equipment
A minimum set of PPE is essential for containment system inspections. This includes chemical-resistant gloves, safety goggles, steel-toed boots, and coveralls. These items protect against chemical residues, sharp edges on corroded materials, and physical risks like slippery surfaces. When performing tactile inspections, opt for heavy-duty chemical-resistant gloves to shield your hands from sharp edges and any residual chemicals. Additionally, ensure that all electrical circuits are deactivated before starting the inspection process.
Once the necessary PPE is in place, shift your focus to isolating the system safely.
System Shutdown and Isolation Steps
Begin by removing primary containers – such as drums, IBC tanks, or bottles – from the containment tray if it is safe to do so. This step allows for an unobstructed view of the tray surface, enabling a more thorough inspection. For systems connected to machinery like generators or electrical equipment, notify all relevant personnel before proceeding with tests or isolation measures.
"The first vital step in the Three Cs of spill response is to stop the source of the spill. Turn off valves, tighten caps, or plug holes to prevent further spillage occurring." – Anthony Sneddon, BDM, Workshop Services, SpillPro [3]
Clear the containment area of any liquids, debris, or chemical residues to ensure all surfaces are visible. Test drainage valves by cycling them fully open and closed to confirm their functionality and check that seals around drain openings remain intact. Make sure drainage plugs are correctly placed, and keep valves closed during the inspection to maintain containment integrity.
With the system isolated and the area cleared, the next step is to gather the tools you’ll need for the inspection.
Tools Needed for Inspection
A successful inspection requires a mix of visual aids, measurement tools, testing equipment, and cleaning supplies. High-quality flashlights or portable lighting are essential for spotting fine cracks, seams, or chemical damage in hard-to-reach areas. Use measuring tape to confirm the tray’s interior dimensions (Length × Width × Height) and verify compliance with the 110% capacity rule for the largest container.
| Tool Category | Specific Tools | Purpose |
|---|---|---|
| Visual Aids | Flashlights, magnifying glasses, cameras | Detecting small cracks, corrosion, and documenting defects |
| Measurement | Measuring tape, ultrasonic thickness gauges | Checking containment capacity and assessing metal wall thinning |
| Testing | pH test kits, chemical compatibility charts | Identifying unknown liquids and ensuring material compatibility |
| Cleaning | Approved cleaners, rags/brushes | Clearing debris and residues to expose the tray surface |
Always consult chemical compatibility charts to ensure the tray material – whether polyethylene, steel, or fiberglass – can withstand exposure to specific solvents or acids. Keep Safety Data Sheets (SDS) and a Register of Hazardous Chemicals nearby for quick reference when dealing with any residues or unknown substances.
This content is for informational purposes only. Consult official regulations and qualified professionals before making sourcing or formulation decisions.
Visual Inspection Methods
Start by carefully examining all cleaned and isolated surfaces under high-intensity LED lighting. This helps identify cracks, discoloration, and other irregularities that might not be visible under normal lighting conditions. Be sure to inspect both the interior and exterior of the system, as stress cracks often develop internally before becoming noticeable from the outside [4]. Any chemical residue, dirt, or debris left on the surface can obscure critical defects like hairline cracks or early pitting. To ensure accurate results, clean all surfaces thoroughly and allow them to dry completely before inspection.
"A dirty tank cannot be properly inspected." – Poly Processing [4]
After the initial inspection, shift your focus to external signs that could indicate corrosion damage.
Spotting External Corrosion Signs
Pay close attention to rust, pitting, and discoloration on metal components such as ladders, brackets, stabilizers, and stands. For polymer systems, watch for signs like crazing (fine spider-web-like cracks), brittleness, and discoloration caused by UV exposure or chemical vapors [4]. Even tank domes, which don’t come into direct contact with liquids, can suffer from oxidation and embrittlement due to chemical vapors.
Press gently on the bottom of trays to check for flexing, which could indicate thinning or weakening material [1]. Cracks in polyethylene that are at least 1/32 inch (0.03 inches) deep require further testing to determine whether the system is still safe to use [4]. Pay extra attention to seams, joints, and corners – particularly where sidewalls meet the bottom – as these areas are more likely to develop cracks or compromised seals. These detailed observations are essential for staying compliant with regulations and avoiding containment failures.
Checking Individual System Components
In addition to surface inspections, examine the system’s individual components. Inspect fittings, gaskets, and connections for signs of chemical wear, such as discoloration, weeping, or brittleness [4]. These areas are especially vulnerable to leaks because of their constant exposure to chemicals. Check drainage plugs, valves, and seals for any signs of deterioration, and ensure that protective coatings on metal grating or shelving remain intact. Chips or scratches in paint or powder coating can become starting points for rust and pitting [2].
"Check fittings, hoses, gaskets, and all connections for any signs of general corrosion or deterioration and leaks." – Poly Processing [4]
For spill sumps, inspect the chemical-resistant lining for tears, warping, or bubbling – these are signs of chemical damage. Feel seams and joints for subtle cracks or irregularities [1]. It’s a good idea to perform a quick visual inspection immediately after chemical deliveries or container repositioning. This can help you catch impact damage early, before it worsens. Regular and thorough checks of system components are vital for preserving structural integrity and ensuring the containment system continues to meet regulatory requirements.
This content is for informational purposes only. Consult official regulations and qualified professionals before making sourcing or formulation decisions.
Non-Destructive Testing Techniques
When visual inspections fall short in assessing corrosion damage, non-destructive testing (NDT) methods step in to provide accurate evaluations – without compromising the integrity of your containment system. These methods go beyond surface-level checks, uncovering hidden issues like subsurface cracks, material degradation, and thinning that could weaken structural stability. They are especially useful for detecting corrosion concealed beneath protective coatings.
"When it comes to keeping storage tanks safe and compliant, ultrasonic tank inspection is the gold standard." – ScanTech [6]
Each NDT technique serves a specific function, and selecting the right one depends on factors like your containment material, the type of defect being investigated, and the level of detail required. Knowing how these tools work helps you decide when and how to use them during inspections. Below are some key methods that provide deeper insights than visual checks alone.
Using Ultrasonic Thickness Gauges
Ultrasonic testing (UT) measures the thickness of materials by sending sound waves through them and calculating the time it takes for the waves to return. With an accuracy of 0.1 mm (0.004 inches), this method is ideal for detecting wall thinning in metal tanks, trays, and structural supports [6]. Before testing, clean the area of any rust, paint, or scale and apply a coupling gel to ensure clear signal transmission [6].
For weld inspections, a B-scan provides quick results, while a C-scan offers detailed, color-coded mapping for larger areas [6][7]. Automated UT C-scan mapping is preferred for extensive coverage and high-resolution imaging, while manual UT tools (like the Evident DL38) are better for tight spaces or uneven surfaces [7]. To ensure accuracy, always perform a step-wedge test or use a block of known thickness at the start of every shift [6].
In a documented study of 20-ft diameter carbon-steel tank shells, assessments using the API 653 formula revealed that shells with an average thickness above 0.25 inches were deemed acceptable. Those below this threshold required repair or replacement [7].
Magnetic Particle Testing
Magnetic particle testing (MPT) is designed to detect surface and near-surface flaws in ferromagnetic materials like steel, nickel, cobalt, iron, and their alloys [8]. The process works by inducing a magnetic field through the material. Cracks disrupt the field, causing "flux leakage", which attracts magnetic particles to the defect site, making them visible [8]. Clean and dry the surface beforehand, as rough or uneven areas could interfere with accurate readings [8].
The testing process includes surface preparation, magnetizing the material, applying particles, inspecting for defects, reversing the magnetic field, and finally, demagnetizing [8]. Magnetization can be achieved using electromagnetic yokes, permanent magnets, or flexible coils. Magnetic particles come in two forms: dry or wet. Wet particles, typically suspended in oil or water, are more effective for detecting small flaws, while dry particles (ranging from 50 to 150 mm) are used for general applications [8].
"Inadequate magnetization risks missing critical flaws, while excessive magnetization leads to irrelevant indications." – OnestopNDT [8]
To ensure proper magnetization levels, use tools like an ASME Pie Gauge, Burmag Castrol strip, or Quantitative Quality Indicator (QQI) shims [8]. Repeat the test with the magnetic field oriented differently to capture defects in all directions, and demagnetize the material afterward – residual magnetism should not exceed (+/-) 2 gausses [8]. For surface cracks that might go undetected by MPT, dye penetrant testing is the next step.
Dye Penetrant Testing
Dye penetrant testing highlights surface cracks and flaws in metal components that might otherwise go unnoticed [9]. This method is particularly effective for inspecting welds, joints, and stress-prone areas in containment trays or tank shells. The quality of the inspection depends heavily on the penetrant materials used, which should comply with industry standards like AMS 2644 [9].
"Any contaminates or moisture on the surface of the part or within a flaw can prevent the penetrant material from entering the defect." – NDE-ED.org [9]
Before testing, ensure the surface is clean and within the recommended temperature range of 39°F to 125°F for optimal performance [9]. Apply the penetrant generously via spraying, dipping, or brushing, and allow it to seep into any cracks [9]. Remove excess penetrant carefully using water or a specific emulsifier, ensuring the material within the defects is not washed away. Then, apply a developer to draw the penetrant back to the surface, making flaws visible [9]. Inspect the area under appropriate lighting – UV light for fluorescent penetrants or visible light for color-contrast penetrants [9].
This content is for informational purposes only. Consult official regulations and qualified professionals before making sourcing or formulation decisions.
Inspecting Different Materials
Inspections for concrete, metal, and polymer systems should be tailored to address their unique degradation patterns. Concrete may crack and spall due to chemical attacks or corrosion of internal steel. Metal systems are prone to rust and thinning caused by moisture and galvanic reactions, while polymers can lose their structural integrity or become brittle from chemical exposure. Understanding these specific vulnerabilities is key to identifying issues early and maintaining containment capacity. Below, you’ll find inspection approaches tailored to each material type.
Concrete Containment Systems
When inspecting concrete, document visible issues like cracks, spalling, rust stains, or efflorescence, as these can signal chloride-induced corrosion or structural damage. Surface scaling, which appears as pitting or mortar loss, often results from freeze-thaw cycles or chemical exposure. Visual assessments may need to be supplemented with non-destructive testing for a deeper evaluation.
Acoustic sounding methods, like using a hammer or chain drag (per ASTM D4580), can reveal hollow sounds that indicate subsurface delamination, even when the surface looks intact. For more precise insights, applying a phenolphthalein indicator to a freshly fractured surface can help assess pH levels. A lack of color change indicates a pH below 9, suggesting steel passivation failure and active corrosion.
Half-cell potential readings below –350 mV (CSE) suggest a high likelihood of reinforcing steel corrosion, while chloride levels between 0.20% and 0.40% by cement weight are typical thresholds for initiating corrosion. Ground-penetrating radar (GPR) is another effective tool for locating rebar and identifying voids without damaging the surface, aiding in planning further tests.
Metal Containment Systems
Focus metal inspections on high-risk areas like shell-to-bottom junctions, penetrations, and spots prone to water pooling or damaged insulation. Look for signs such as "weeping welds" (rust bleeding from weld crevices) and corrosion in overlapped sections, as these are common failure points. Moisture-prone flat surfaces may corrode faster, so consider adding drain holes to mitigate this risk.
"Moisture retained by insulation accelerates hidden corrosion, leading to thinning, pitting, and metal loss." – TechKnowServ Corporation [7]
For galvanized systems, a magnetic thickness gauge can estimate the remaining coating life by comparing readings to "Time to First Maintenance" charts. Use the gauge to differentiate between red rust and cosmetic brown staining – if the coating is still intact, the staining likely doesn’t affect performance. Galvanized coatings can provide cathodic protection for bare metal areas up to 0.20 inches wide, depending on the electrolyte present.
A case study of a carbon-steel tank with a 20-ft diameter and 0.375-in nominal thickness illustrates the importance of precise measurements. One corroded region had a minimum thickness of 0.22 in but an area-average thickness of 0.252 in, which exceeded the required minimum of 0.25 in and was deemed acceptable. Another area, however, measured a minimum of 0.18 in with an area-average of 0.210 in, falling below the threshold and requiring repair or replacement.
Polymer and HDPE Systems
Inspect polymer and HDPE systems for internal and external cracking, crazing, or brittleness. Stress cracks often appear internally first, so use a bright light through manway openings or other access points to identify these issues. Pay particular attention to high-stress areas like corners and joints where sidewalls meet the bottom or dome.
"An interior inspection is essential because stress cracks can often show up on the inside of a tank before appearing on the outside." – Poly Processing [4]
If cracks are found, gently scrape about 1/32" of the surface to assess their depth. Test for flexibility in containment tray bottoms by pressing to check for structural rigidity loss. Ultrasonic tools can measure wall thinning on empty systems, while running a hand along seams and joints can help detect small, hidden cracks.
Advanced tests like the ASTM-D 1998 impact test and gel testing can determine if the polyethylene has become brittle or is nearing the end of its lifespan. For systems storing fume-emitting chemicals, inspect domes for oxidation and embrittlement, even if there’s no direct liquid contact. Always confirm chemical compatibility with the polymer material to prevent rapid degradation, as polyethylene isn’t suitable for all solvents.
This content is for informational purposes only. Consult official regulations and qualified professionals before making sourcing or formulation decisions.
Recording Results and Taking Action
After completing visual and non-destructive inspections, it’s crucial to record your findings accurately. Using digital tools to document inspection data helps create a reliable history for maintenance planning and regulatory audits [1]. Each inspection report should include a "Defects & Maintenance Notes" section to detail issues like corrosion levels, crack locations, or signs of chemical degradation. Including electronic signatures ensures a verifiable audit trail, which is essential for Environmental Health and Safety (EHS) personnel and aligns with EPA and SPCC regulations [1].
How Often to Inspect
The EPA’s SPCC rule mandates inspections and testing for aboveground containers but leaves the frequency and methods to the discretion of a Professional Engineer, following industry standards [10]. Here’s a general guideline:
- Weekly: Perform visual checks for accumulated liquids, debris, or contamination.
- Monthly: Conduct physical inspections of tray surfaces, support structures, and grating.
- Quarterly: Test drainage systems and verify capacity using the formula: Length × Width × Height (in inches) ÷ 231 = gallons.
- Annually: Assess the system for wear or aging to determine if replacement is necessary [1].
Keeping Inspection Records
Keep detailed records, including photos, measurements, and notes, to monitor degradation and ensure EPA compliance. Updating documentation quarterly helps maintain an organized paper trail for regulatory audits [1].
When to Repair or Replace
Take immediate action if drain valves or seals fail to hold integrity when closed, or if cracks are found in seams and joints [1]. If ultrasonic testing reveals wall thinning below acceptable limits, repair or replace the system to stay compliant. Annual reviews should determine whether wear, age, or inventory changes warrant system replacement. If corrosion is present, reevaluate chemical compatibility and confirm that containment capacity still meets the 110% standard. Even without full system failure, degradation can reduce effective volume, impacting compliance and environmental safety [1].
This content is for informational purposes only. Consult official regulations and qualified professionals before making sourcing or formulation decisions.
Conclusion
Effective corrosion assessment goes beyond routine maintenance – it’s a key measure to prevent catastrophic environmental events and avoid hefty regulatory penalties. Consider the 2014 Elk River chemical spill in West Virginia, where a corroded above-ground storage tank caused a disaster that led to a $151 million class-action settlement. Similarly, a 2015 jet fuel spill at Sand Island resulted in a $150,000 EPA fine due to undetected corrosion [5]. These cases highlight a crucial point: operators bear direct responsibility for spills, and overdue inspections offer no legal protection [5].
A proactive inspection schedule is essential to catch early signs of corrosion. This includes everything from regular visual inspections to detailed annual evaluations. Using advanced non-destructive testing methods like ultrasonic thickness gauging can reveal hidden pitting that simple spot checks might overlook. This is especially important when dealing with microbiologically induced corrosion, which can erode materials at rates of 1-2 mm per year [5].
Maintaining accurate digital records – complete with photos and precise measurements – creates a reliable audit trail and ensures timely repairs when problems arise [1].
The stakes are too high to cut corners. Comprehensive inspection protocols and meticulous recordkeeping protect not only your facility but also the surrounding environment from costly and preventable failures.
This content is for informational purposes only. Consult official regulations and qualified professionals before making sourcing or formulation decisions.
FAQs
What corrosion signs mean a containment system is unsafe?
Visible damage is a clear sign of an unsafe spill containment system, particularly when you notice warped, cracked, or deformed sidewalls. Other warning signs include seams or joints that are no longer watertight, which can compromise the system’s integrity. During routine inspections, keep an eye out for overheating, structural damage, or advanced stages of corrosion. These issues can lead to system failure, creating serious safety hazards and environmental threats.
When should I use NDT instead of just a visual check?
Non-destructive testing (NDT) is a crucial method for assessing the integrity of containers, piping, valves, and other equipment, especially when visual inspections fall short. It’s particularly useful for detecting internal or subsurface issues that might not be visible on the surface. By identifying structural concerns in critical components – even in the absence of visible corrosion – NDT offers a deeper level of analysis. This approach helps predict and prevent potential leaks or spills, making it a vital part of any comprehensive inspection program.
How do I choose the right containment material for my chemicals?
When choosing a containment material, it’s crucial to ensure it can handle the specific chemicals being stored without corroding or breaking down. Start by confirming the material’s chemical compatibility and its adherence to regulations, such as EPA guidelines, which set standards for proper sizing and construction. For example, while polyethylene might work well for certain substances, it may not be suitable for all solvents. Focus on materials that offer strong chemical resistance and structural durability to ensure effective spill containment and meet regulatory demands.


Comments are closed