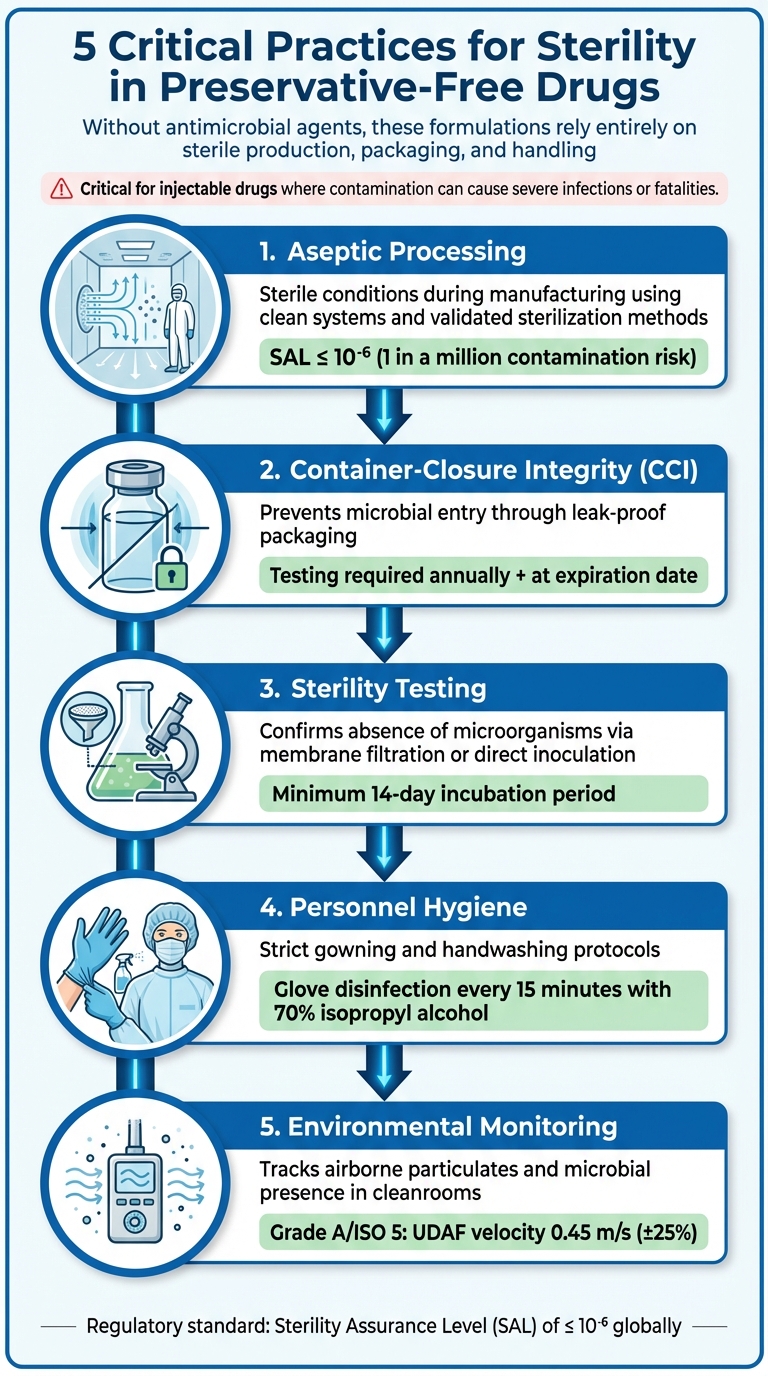
Preservative-free drugs require strict sterility controls. Without antimicrobial agents, these formulations rely entirely on sterile production, packaging, and handling to prevent contamination. This is especially critical for drugs administered via injection, where contamination can cause severe infections or even fatalities. Key practices include:
- Aseptic Processing: Ensures sterile conditions during manufacturing, using clean systems and validated sterilization methods.
- Container-Closure Integrity (CCI): Prevents microbial entry by testing packaging for leaks or breaches over time.
- Sterility Testing: Confirms the absence of microorganisms through rigorous methods like membrane filtration or direct inoculation.
- Personnel Hygiene: Reduces contamination risks through strict gowning and handwashing protocols.
- Environmental Monitoring: Tracks airborne particulates and microbial presence in cleanrooms.
5 Critical Practices for Ensuring Sterility in Preservative-Free Drugs
Challenges of Preservative-Free Formulations
What Are Preservative-Free Drugs?
Preservative-free drugs are pharmaceutical products that do not include antimicrobial agents to prevent microbial growth. Unlike multi-dose vials that rely on preservatives, these formulations depend entirely on sterile production and packaging to maintain their integrity. Such products are particularly important in clinical situations where preservatives could lead to toxicity or adverse reactions. In the absence of preservatives, maintaining sterility becomes the primary safeguard against contamination.
Regulatory Requirements for Sterility
For drugs labeled as sterile, regulatory agencies consider sterility a "stability characteristic" that must be preserved throughout the product’s shelf life. Manufacturers are required to prove that the container-closure system effectively prevents microbial contamination over time [2]. According to 21 CFR 211.167(a) and 21 CFR 610.12, every batch or lot must undergo sterility testing to meet these stringent requirements [2]. Globally, the standard for sterility is a Sterility Assurance Level (SAL) of ≤ 10⁻⁶, meaning the likelihood of contamination must not exceed one in a million [4]. Traditional sterility testing involves at least seven days of incubation, and manufacturers must also perform container-closure integrity tests both annually and at the product’s expiration date [2].
Contamination Risks and Challenges
Preservative-free formulations are vulnerable to contamination at various stages of production. Key risks include bioburden from non-sterile raw materials, residual endotoxins that aren’t completely removed during processing, and microbial infiltration during aseptic procedures like milling or blending [3]. Equipment failures can further jeopardize sterility. For instance, issues with Sterilize-In-Place (SIP) systems – such as condensate buildup in "cold spots" – can compromise the sterility of even tightly controlled environments [3].
"Compounded medications made without the guidance of standards may be sub-potent, super potent or contaminated, exposing patients to significant risk of adverse events or even death" [1].
Traditional sterility testing has its limitations. It is destructive, susceptible to false positives, and only identifies organisms capable of growth [2]. These challenges highlight the critical importance of rigorous aseptic processing, which is explored in the next section.
Disclaimer: This content is for informational purposes only. Consult official regulations and qualified professionals before making sourcing or formulation decisions.
sbb-itb-aa4586a
Release & Stability Testing Requirements for Parenteral Drug Products
Aseptic Processing Best Practices
Maintaining sterility in preservative-free formulations demands strict adherence to aseptic procedures. Since these formulations lack preservatives, the entire process hinges on validated methods that prevent contamination. The updated EU GMP Annex 1 guidelines outline stringent requirements for contamination control, emphasizing a comprehensive Contamination Control Strategy (CCS) to address risks throughout production [5].
Personnel Training and Hygiene
Human operators are the primary source of contamination in aseptic environments. To mitigate this risk, personnel must follow a detailed gowning process: covering shoes, hair, and beard; wearing a mask; washing hands; donning a gown; applying an antimicrobial scrub; and using sterile gloves [6]. Handwashing should last at least 30 seconds with soap and water, followed by a scrub containing 1% chlorhexidine and 62% alcohol. Sterile gloves must be disinfected with 70% isopropyl alcohol every 15 minutes, and gloves should be inspected routinely for damage [6][7].
Facilities should display clear checklists for gowning, hand hygiene, and disinfection to ensure consistency [6]. Monitoring personnel across all shifts, including second and third shifts, is essential to verify compliance with these hygiene protocols [3]. These measures, combined with environmental controls, create a robust barrier against contamination.
Environmental Monitoring and Contamination Control
Constant monitoring for particulates and microorganisms is critical, especially under unidirectional airflow (UDAF) systems designed to maintain Grade A/ISO 5 conditions [7]. The standard UDAF downward velocity for product protection is typically set at 0.45 m/s (±25%) [7]. Pressure cascades between cleanroom grades must also be monitored to prevent air from lower-grade areas from infiltrating aseptic zones [3][7].
Surface sampling with contact plates should focus on key areas such as equipment and facility walls to detect microbial contamination [3]. Acceptable bioburden levels for bulk products before final filtration are usually capped at 10 colony-forming units (CFU) per 100 mL [7]. Endotoxin testing samples, typically 10–20 mL in volume, must not exceed 1 endotoxin unit (EU) per mL [7]. Direct surface sampling is more reliable than air settling plates for identifying contamination on equipment and should be prioritized [3]. Together, these monitoring and control measures lay the groundwork for effective aseptic filling and sealing.
Aseptic Filling and Sealing Processes
Sterile integrity during filling and sealing relies on the foundation of personnel and environmental protocols. All aseptic manipulations must occur within an ISO Class 5 environment, ensuring exposure to "first air" – HEPA-filtered air free of particulates [6]. Critical steps like precipitation, drying, milling, and blending should take place in closed systems to minimize microbial risks. Equipment involved in the fluid pathway must be sterilized, with clean, saturated steam under pressure being the preferred method for sterilization-in-place (SIP) systems [3].
"The sanitization, rather than sterilization of this equipment, is unacceptable." – FDA Inspection Guide [3]
Validating SIP systems requires placing biological indicators (BIs) and temperature sensors in areas prone to condensate buildup, such as low spots and steam discharge points. Sterilization cycles must achieve a Sterility Assurance Level (SAL) of 10⁻⁶ or better [5]. Vial capping and crimping should occur in a Grade A environment to maintain the sterility of the closure interface [5]. Additionally, modern barrier systems like Restricted Access Barrier Systems (RABS) and isolators are highly recommended to physically separate operators from the aseptic core [5].
Disclaimer: This content is for informational purposes only. Consult official regulations and qualified professionals before making sourcing or formulation decisions.
Container-Closure Integrity
Maintaining sterility over time in preservative-free drugs depends entirely on the container-closure system, which serves as the primary defense against microbial contamination. Since these drugs lack preservatives to protect the formulation, even a small breach in the system can pose a significant risk. The FDA underscores the importance of tailoring material selection to the specific container-closure system, product formulation, and route of administration [2][8]. This requires careful evaluation and testing of packaging materials to ensure they uphold sterility throughout the product’s shelf life.
Selecting Packaging Materials
The foremost consideration when choosing packaging materials is their ability to maintain a reliable microbial barrier over time. Key components include primary containers (such as vials, ampules, and bottles), closures and liners (like stoppers and screw caps), seals, over-seals, and any parts used during administration [2][8]. Glass vials combined with elastomeric stoppers and aluminum seals are commonly used for injectable preservative-free drugs due to their proven ability to block contamination effectively. Additionally, all materials must comply with USP <661.1> and <661.2> standards, ensuring they don’t react with, add to, or absorb substances that could compromise the drug’s safety or purity [9].
Testing sterility at the start of a product’s life cycle is not enough to confirm long-term barrier integrity. Packaging materials must work with validated methods – such as vacuum decay or gas permeation tests – that verify the system’s integrity over the entire storage period [2][8]. For fused containers like glass or plastic ampoules, 100% integrity testing is mandatory to ensure no breaches occur [9].
Container-Closure Integrity Testing
Container-Closure Integrity Testing (CCIT) offers a proactive way to detect breaches before contamination happens, making it a more dependable method than traditional sterility testing for ensuring product stability. The FDA has noted that sterility tests often lack reliability and require at least seven days of incubation to deliver results [2][8]. In contrast, CCIT methods are typically faster, provide real-time results, and are non-destructive, allowing the same samples to be used for other stability assessments.
"The ability of the container-closure system to maintain the integrity of its microbial barrier, and, hence, the sterility of a drug product throughout its shelf life, should be demonstrated." – FDA [2][8]
Integrity tests can be categorized into physical/chemical methods (e.g., vacuum decay, pressure decay, helium leak, bubble tests, dye penetration, electrical conductivity) and microbiological methods (e.g., microbial challenge or immersion). Non-destructive methods like vacuum decay and helium leak testing are particularly useful for vials, offering quick and reliable confirmation of barrier integrity. These tests are typically performed annually and at the product’s expiration date. For drug products containing components that could interfere with microbial challenge testing, media-filled containers may be used in validation studies [2][8]. After testing, thorough validation and detailed documentation are essential to confirm the system’s ongoing ability to maintain sterility.
Validation and Documentation
A test method is only considered valid if scientific studies demonstrate its ability to detect breaches specific to the container-closure system in use. This validation must be tailored to the product-package combination being tested [2][8]. Manufacturers producing several products with the same container-closure system can use a bracketing approach, validating a single test method for all products instead of testing each one individually.
For new marketing applications, CCIT should be incorporated into the stability protocol from the beginning. For approved products, manufacturers can replace sterility testing with CCIT by submitting the appropriate regulatory supplement, such as a "Changes Being Effected" supplement under 21 CFR 314.70 for human drugs [2][8]. Regulatory submissions should clearly describe the chosen test method, explain its role in maintaining microbial integrity, and include supporting data, especially if media-filled containers are part of the validation process.
Disclaimer: This content is for informational purposes only. Always consult official regulations and qualified professionals before making sourcing or formulation decisions.
Sterility Testing Methods
When dealing with preservative-free drugs, sterility testing becomes a non-negotiable step to ensure safety. Without preservatives, these products rely solely on rigorous testing to confirm they are free from viable microorganisms. As the FDA points out, sterility tests detect only those microorganisms present during testing, and results can sometimes be influenced by accidental contamination[2]. Two primary methods are commonly used: membrane filtration and direct inoculation.
Membrane Filtration vs. Direct Inoculation
Membrane filtration (MF) is ideal for filterable liquids, such as aqueous, oily, or alcoholic solutions[10]. In this method, the product is passed through a 0.45 µm membrane filter, which traps microorganisms. The membrane is then rinsed with a sterile diluent (e.g., Fluid A or Fluid K) to remove any residual antimicrobial activity before transferring it to culture media. This technique is particularly useful for preservative-free drugs, as it helps neutralize any inherent antimicrobial effects.
On the other hand, direct inoculation (DI) is used for non-filterable items like devices, sutures, or certain solids[10]. Here, the product is directly added to the culture medium. However, the sample volume must not exceed 10% of the medium to avoid inhibiting microbial growth. While DI can be effective, it involves more manual handling, which increases the risk of false positives due to environmental contamination[2].
| Feature | Membrane Filtration (MF) | Direct Inoculation (DI) |
|---|---|---|
| Primary Application | Filterable liquids, soluble solids, and oils | Non-filterable items, devices, and sutures |
| Antimicrobial Removal | Rinsing with sterile diluents | Chemical neutralization or dilution |
| Sample Volume | Large volumes can be processed | Limited to 10% of medium volume |
| Risk of False Positives | Lower, due to reduced handling | Higher, due to increased manual manipulation |
Both methods require a minimum incubation period of 14 days to detect slow-growing microorganisms[10]. Validation is essential when testing a new product or modifying experimental conditions to ensure the formulation does not inhibit microbial growth during testing.
Culture Media and Incubation Conditions
To capture a wide range of potential contaminants, sterility testing employs a dual-media approach. Fluid Thioglycollate Medium (FTM) is primarily used to detect anaerobic bacteria but can also support some aerobic growth. It is incubated at 32.5 ± 2.5°C (approximately 90.5°F)[10]. Soybean-Casein Digest Medium (SCDM), on the other hand, supports the growth of fungi and aerobic bacteria and is incubated at 22.5 ± 2.5°C (approximately 72.5°F)[10].
FTM should be inspected for color changes during incubation. If more than one-third of the medium turns pink (indicating oxygen uptake), it can be restored by heating[10]. Both media must undergo sterilization through a validated process and be tested for their ability to promote microbial growth. For FTM, challenge organisms like Staphylococcus aureus, Pseudomonas aeruginosa, and Clostridium sporogenes are used. For SCDM, organisms such as Bacillus subtilis, Candida albicans, and Aspergillus niger are common. Growth promotion tests typically involve inoculating the media with fewer than 100 colony-forming units (CFU). To maintain accuracy, strict temperature control is crucial, and if turbidity occurs due to the product, transferring a portion of the medium to fresh vessels after 14 days can help confirm results[10].
Neutralization Techniques for Antimicrobial Properties
Preservative-free drugs with inherent antimicrobial properties, such as antibiotics or concentrated electrolytes, require careful neutralization during sterility testing. This can be achieved by rinsing the membrane (up to five flushes of 200 mL each) or using chemical agents like β-lactamase for penicillins and cephalosporins. For formulations containing lecithin or oils, rinsing with Fluid D or Fluid K (which includes polysorbate 80) can help minimize antimicrobial activity[10].
Neutralization methods must undergo validation through a bacteriostasis/fungistasis test. This involves inoculating the product-medium mixture with fewer than 100 CFU of challenge microorganisms to ensure microbial growth is not inhibited. According to USP <71>:
"If clearly visible growth of microorganisms is obtained after the incubation, visually comparable to that in the control vessel without product, either the product possesses no antimicrobial activity under the conditions of the test or such activity has been satisfactorily eliminated"[10].
Disclaimer: This content is for informational purposes only. Always consult official regulations and qualified professionals before making sourcing or formulation decisions.
In-Use Stability and Beyond-Use Dating
Once a preservative-free drug passes sterility testing and reaches the market, the focus shifts to ensuring it remains sterile throughout its intended usage period. The FDA emphasizes that maintaining sterility is heavily dependent on the container-closure system. According to their guidance, "The ability of the product to retain its sterile condition is a function of the container-closure system" [11]. Alongside proper packaging, validated storage conditions are critical to preserving sterility. This makes determining beyond-use dating (BUD) and conducting validated stability tests vital. Below, we’ll explore the key steps for maintaining sterility during in-use storage.
Determining Beyond-Use Dating
Establishing a reliable BUD involves rigorous testing. For sterile products, the FDA regards sterility as a core stability characteristic that must be verified throughout the product’s entire shelf life or usage period [2]. Manufacturers are required to validate expiration dates through extensive testing under defined storage conditions.
During stability studies, it’s essential to document actual temperature and humidity. Controlled room temperature, as defined by the USP, ranges from 15°C to 30°C (59°F to 86°F). However, using 24°C to 25°C (approximately 75°F to 77°F) as a benchmark for thermal exposure is often recommended [11].
For products requiring reconstitution, separate expiration dates must be validated. These products need two distinct expiration dates: one for the unreconstituted (dry) product and another for the reconstituted form. The FDA states, "Any drug product intended for reconstitution and not bearing an expiration date for the unreconstituted product and another expiration date for the product after reconstitution is considered to be out of compliance" [11].
Stability Testing and Documentation
Once expiration dates are established, ongoing stability testing is necessary to ensure the product remains sterile. The FDA recommends container-closure integrity testing (CCIT) as the preferred method for monitoring sterility. Techniques like bubble tests, pressure decay, vacuum decay, trace gas permeation, or dye penetration can detect potential breaches in the microbial barrier before contamination occurs [2]. These methods are faster and more reliable than traditional seven-day sterility tests [2].
The FDA advises against relying on sterility tests as part of a stability program, stating, "Sterility tests are not recommended as a component of a stability program for confirming the continued sterility throughout a product’s shelf life or dating period" [2].
Maintaining sterility requires consistent verification, mirroring the controls used during aseptic processing. Integrity testing should occur at the initial time point, annually, and at the end of the product’s expiration period. A typical stability testing schedule might include testing at the start, every three months during the first year, every six months in the second year, and annually thereafter [11]. When multiple container sizes are available, the smallest container – due to its higher surface area-to-volume ratio – should receive priority testing [11].
| Test Method Category | Examples | Key Advantages for Stability Programs |
|---|---|---|
| Physical/Chemical CCIT | Bubble tests, pressure/vacuum decay, trace gas permeation, dye penetration, electrical conductivity | Non-destructive (often), faster results, detects breaches before contamination |
| Microbiological CCIT | Microbial challenge or immersion tests | Directly evaluates the microbial barrier under stressed conditions |
| Traditional Sterility | Membrane filtration, direct inoculation | Required for initial release; limited role in long-term stability |
Post-Dispensing Handling Protocols
Proper handling after dispensing is just as critical as manufacturing when it comes to maintaining sterility. Once a product is released, strict adherence to labeled storage instructions becomes essential. Sterility is guaranteed only for unopened products stored under the specified conditions [11].
For multi-dose vials, it’s standard practice to label them with the date of opening and discard them within 28 days unless the manufacturer provides alternative instructions [6]. Combining contents from multiple single-use vials is never recommended, as this compromises sterility. Single-dose preservative-free products should be used immediately after opening, with any unused portions discarded.
Environmental factors also play a role. Products sensitive to light or moisture need to be stored in opaque packaging or low-humidity environments, as specified by the manufacturer [11]. Following the storage conditions outlined on the product label is crucial to ensure sterility is maintained.
Disclaimer: This content is for informational purposes only. Always consult official regulations and qualified professionals before making sourcing or formulation decisions.
Conclusion
Ensuring sterility in preservative-free drugs requires a comprehensive strategy that begins during manufacturing and extends throughout the product’s shelf life. Aseptic processing plays a central role in this effort, relying on closed systems, controlled handling, and repeated validation to maintain sterility [3]. Sterilization using saturated steam – rather than mere sanitization – is essential to eliminate microbial risks, as even minor breaches in sterility can jeopardize an entire batch [3]. This vigilance continues with container-closure systems designed to safeguard the product.
Container-closure integrity testing has emerged as a dependable way to monitor sterility over time. According to the FDA, initial sterility testing alone is insufficient to confirm the integrity of container-closure systems [2]. Advanced physical and chemical tests, such as pressure decay or dye penetration, are more effective at identifying packaging breaches than traditional seven-day sterility tests [2]. Performing these tests regularly – both annually and at the product’s expiration date – helps ensure the packaging continues to protect the drug throughout its shelf life.
To support these measures, manufacturers must validate every critical step where sterility is required. This includes consistent validation processes and environmental monitoring across all shifts, tracking the bioburden of non-sterile materials, and maintaining detailed records of storage conditions. Such efforts ensure that sterility is upheld at every stage.
By adhering to these practices – validated aseptic processing, robust container-closure systems, and rigorous integrity testing – manufacturers can confidently deliver sterile products that remain safe and effective from production to patient use. These steps are not only vital for patient safety but also for meeting regulatory standards.
Disclaimer: This content is for informational purposes only. Always consult official regulations and qualified professionals before making sourcing or formulation decisions.
FAQs
Why is it important to maintain container-closure integrity for preservative-free drugs?
Maintaining the integrity of container-closure systems is crucial for preservative-free medications to remain sterile and safe from microbial contamination. Without preservatives to curb microbial growth, even the smallest breach in the container-closure system can jeopardize the drug’s safety and effectiveness.
A well-designed container-closure system acts as a shield, keeping the drug free from external contaminants like bacteria and particles. It also ensures the medication’s stability and quality are maintained throughout its shelf life. This level of protection is especially vital for sensitive formulations used in tightly regulated sectors like pharmaceuticals.
What’s the difference between membrane filtration and direct inoculation in sterility testing?
The main distinction between membrane filtration and direct inoculation lies in their approach to detecting microbial contamination. In membrane filtration, a liquid sample is passed through a sterilizing filter that traps microorganisms. This filter is then placed on growth media and incubated to observe any microbial growth. This technique is particularly effective for samples with small volumes or low microbial loads, as it concentrates potential contaminants, making them easier to detect.
In contrast, direct inoculation involves adding the sample straight into a growth medium, where any microorganisms present can grow and be identified. This method is better suited for samples that are viscous, contain particulates, or are too large for filtration to be practical. Both techniques play a critical role in verifying the sterility of pharmaceutical products, with the choice of method depending on the nature of the sample and the specific testing requirements.
Why are environmental monitoring and personnel hygiene essential for aseptic processing?
Environmental monitoring and strict attention to personnel hygiene are essential for maintaining sterility in aseptic processing. These measures are key to preventing contamination and ensuring the safety of pharmaceutical products. Monitoring focuses on tracking critical factors such as microbial levels, particle counts, temperature, humidity, and air pressure within controlled environments. This data helps identify risks and verify that systems like HVAC are working properly to uphold sterile conditions.
Equally important is maintaining high standards of personnel hygiene. Proper gowning, thorough handwashing, and adherence to aseptic techniques greatly reduce the chances of introducing contaminants during production. Ongoing training and routine monitoring ensure that staff consistently follow these stringent protocols. Together, these practices protect product integrity and ensure the sterility of preservative-free pharmaceutical formulations.


Comments are closed